In this tutorial, you will learn about how to change the account lockout duration in Windows 10. The Windows 10 operating system accompanies an inbuilt feature that automatically locks the PC – for the current user – after the maximum number of failed login attempts is reached. Remember, the total number of failed login attempts in Windows 10 isn’t consistent as you can manually set or change this number using Local Security Policy. Regardless of what number of failed login attempts you have defined, your Windows 10 PC will get locked for 30 minutes. But, imagine a scenario in which you need to change this default account lockout duration on your PC.
Well, this tutorial will exactly help you do that. Here, I will show you the required steps to replace the default lockout duration of 30 minutes with any custom time duration you want. You can define the custom time length for 1 min, 5 min, 10 min, and so forth. You can do that utilizing the “Local Security Policy” feature in Windows 10.
Also Check:
- How to Find Product Key for your Windows 10 PC
- Close Programs Automatically at Scheduled Time in Windows 10
- How to Delete User Profiles in Windows 10
How to Change Account Lockout Duration in Windows 10?
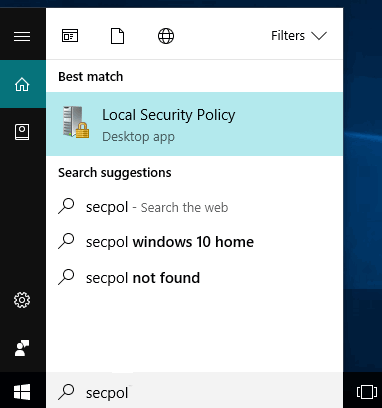
Step 1: First, you would need to open Local Security Policy on your PC. To do that, you can either type “secpol” or “local security policy” in the search bar at the bottom on the taskbar. After that, select the “Local Security Policy” option at the top.
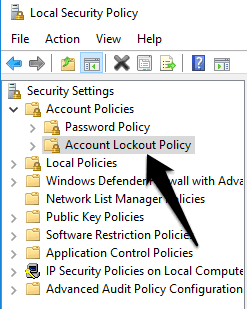
Step 2: Once you do that, the “Local Security Policy” will open up. After that, simply select the “Security Settings >> Account Policies >> Account Lockout Policy” folder on the left panel.
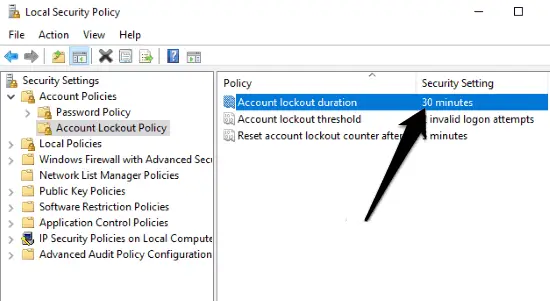
Step 3: When you do that, you can see 3 options under the Policy section – Account Lockout Duration, Account Lockout Threshold, and Reset Account Lockout Counter After. Under the Security Settings section, you will see the default account lockout duration is of 30 minutes.
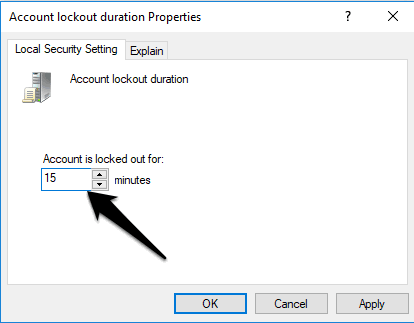
Step 4: Now, to change the account lockout duration manually, you would need to double-click on the Account Lockout Duration option under the Policy section. After that, a popup window will open up where you need to select the “Local Security Settings” tab. Here, you will see an input field – Account is locked out for – under the Account Lockout Duration heading. Now, you can enter any custom duration you want for account lockout in the field.
Step 5: Then click on Apply >> OK to save the new time duration as the Windows 10 account lockout duration. From this point, whenever your PC reaches the maximum number of failed login attempts, it will get locked for the new time duration which you have defined. The lockout is for the current user only.
Conclusion:
So, these are the simple steps required to change the account lockout duration in Windows 10. The inbuilt Local Security Policy feature of Windows 10 makes it pretty simple for you to achieve the same.
Do leave your comments below.