In this post, we will see how to bulk resize images in a Word document. This works for both .doc and .docx files. The best part is that it does not require any software, just a simple Macro code will be added to batch resize images in Word doc.
As you might know, Microsoft Word does not support batch resizing of images. You can manually resize images by pressing right-click on pictures and then select the Size option from context menu. You can then specify its size to resize them. But if you have a large number of images in your Word document then resizing them manually can be tiresome. In this article, I will demonstrate how to resize all images in a Word doc in one single click. You can easily resize all your images at once by using a Macro code I have included below.
This tutorial involves three steps. When you have already completed Step 1 and 2, then feel free to jump to Step 3.
Step 1: Enable Macros in MS Word:
By default, Macros are disabled in MS Word due to security issues. You need to enable macros for performing batch resize of images. You can enable macros by following these steps:
Click on Office icon at top left.
Now click on Word options to pop up Word Options dialog box.

Now switch to Trust Center tab and click on Trust Center Settings.

Switch to Macro Settings tab and select Enable all macros. Also turn on Trust access to the VBA project and object model option.

Step 2: Turn on Developers Menu in MS Word:
After enabling macros, now you need to turn on your Developers menu. You can easily enable it by these steps:
Click on Office icon at top left and select Word option. Now switch to Display tab and select Show Developer tab in the Ribbon. This will enable your Developer tab in Word menu ribbon on the top.

Restart MS Word to reflect changes that you have made. Now, you have completed all the prerequisites to batch resize all your images in a Word document.
Step 3: Macro Code to Batch Resize Images in Word Doc:
Now follow these steps to setup your macro code:
Select Visual Basic in Developer menu to pop up Microsoft Visual Basic window.

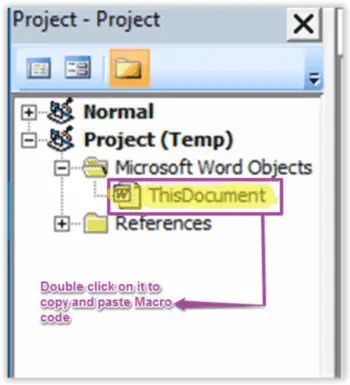
Now, double click on ThisDocument under Project (temp) >> Microsoft Word Objects >> ThisDocument to display code editor window.
Copy and paste the following code in this window:
Sub resize()

Dim i As Long

With ActiveDocument

For i = 1 To .InlineShapes.Count

With .InlineShapes(i)

.ScaleHeight = 300

.ScaleWidth = 500

End With

Next i

End With

End Sub
Now in this code, you can specify required height and width to resize your images (the code above has set Height as 300, and Width as 500).
In this code, resize() is the name of macro. You can specify required height by this option .ScaleHeight = Required height (in pixels) and width by this option .ScaleWidth = Required Width (in pixels).
Now you can run your macro code by 2 methods.
Method 1: You can run it by clicking Run Sub/User Form button.
Method 2: Follow these steps to run your Macro code to batch resize images.
- Click on View Microsoft Button to view your Microsoft Word document file.
- Now click on Macros button in Developer menu to view the list of macros to run. As I said earlier that name of our macro is Resize, so we will run that macro.

- Click on Run.
At this point, all the images in Word doc have been resized to height and width that were specified in the macro
To use this Macro later again, you can save your document as Word Macro-Enabled document.

Now you can run this macro any number of times to batch resize all the images in an MS Word document.
Conclusion:
As Microsoft Word does not have the feature of batch resizing all images, this method can really save our time and effort in manual resizing of the image. This method is very easy to implement and later you can resize all your images with a few clicks. I did not have any problem in implementing it and find it to very accurate in resizing images.
Also Read:


