EaseUS Data Recovery Wizard is a free data recovery software that can be used to easily recover the deleted or formatted data from your PC, external hard drives, SSD, and many other storage devices. It is no doubt one the best recovery software which makes recovering lost data fast and seamless. You can use it to get back the data which you might have accidentally deleted, or when formatted a drive, lost a partition, etc. This data recovery software supports tons of file types like images, videos, audio, documents, archives, and much more.
It provides two different modes named, Quick Scan and Deep Scan to search for the deleted files efficiently. After finding the deleted files using any of these modes, you can preview them and recover those which you want. The best thing about this data recovery software by EaseUS is that it is very easy to use, and you can recover your lost data with just a few clicks.
Note: It comes with both Free and Pro edition. The free version has certain limitations like you can only recover up to 500 MB of lost data, no free lifetime upgrade or support, etc. However, the data limit can be increased up to 2GB if you share this software with others (on Facebook, Twitter, and Google Plus) by clicking the Share button on the interface.
On the other hand, the Pro version doesn’t have these limitations. That means you can recover unlimited lost data, get free lifetime support, etc. One of the Pro plans even support WinPE to boot your PC when it fails to do so or simply crashes.
Now, let us talk about the important features of this software.
Key Features of EaseUS Data Recovery Wizard:
- It has a very intuitive interface to make it more convenient for you to recover your lost data.
- This recovery software supports various devices from which you can recover data such as your PC, HDD, USB, SSD, RAID, server, and more.
- Recovery can be done in various situations like files deleted from Recycle Bin, accidentally deleted files from any drive, files lost while formatting a drive, RAW partition, etc.
- Perform flexible searches with two different scanning modes. The Quick Scan mode uses the faster approach of scanning and finding the deleted data. Whereas, the Deep Scan mode analyzes the select storage device in depth (sector by sector) which makes it a slower process, but more efficient.
- Simple search function (with improved filters) to easily find the deleted or formatted data that you want to recover.
- For each file type, it supports almost all the standard formats. For example, it can recover documents of various file formats such as XLS, XLSX, DOC, DOCX, PDF, PPT, PPTX, HTML, HTM, EPS, and so on.
- Export and import scan results, so that you won’t have to do the entire search again to see the files.
- It is also available for Mac OS.
Now that, we have learned about the amazing features offered by this recovery software, we should see how to actually use it to recover lost data.
How to Recover Lost Data using EaseUS Data Recovery Wizard:
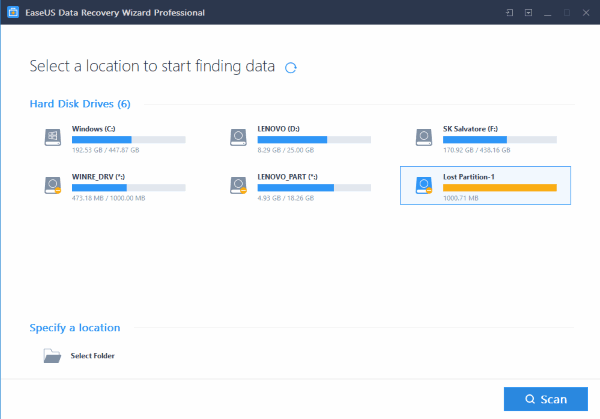
Step 1: To get started, simply install and open this software on your PC. After you do that, you can see all your PC drives including the lost partitions (if any). If you want to recover data from any removable device, then make sure to connect it to your PC. Now, you can select any location you want to search for the deleted files. It also provides an option to select specific folders to find lost data.
Step 2: After selecting a location, you can go ahead and click on the “Scan” button visible at the bottom of the window. As soon as you do that, it will automatically start the quick scan to find the files which you have simply deleted from the selected location or from the Recycle Bin. Followed by the quick scan, the deep scan will begin automatically and find more lost data by doing in-depth scanning of the entire drive or storage location. You can also pause or stop the scanning by clicking the “Pause” and “Stop” button on the left pane.
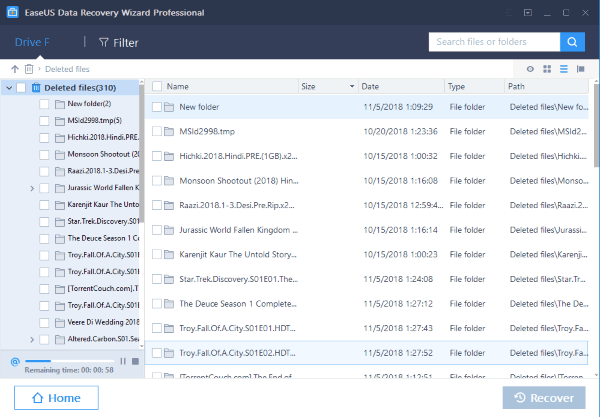
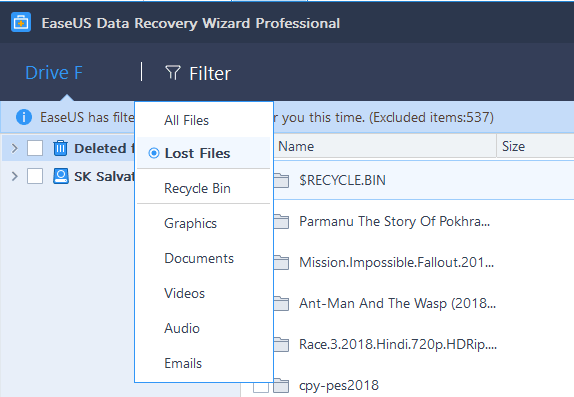
Step 3: Once the scanning is done, you can filter the search results by file types, lost files, etc. To do that, you would need to simply click on the “Filter” option at the top and choose the filter. You will also see a search bar at the top of the window which will allow you to find required files quickly.
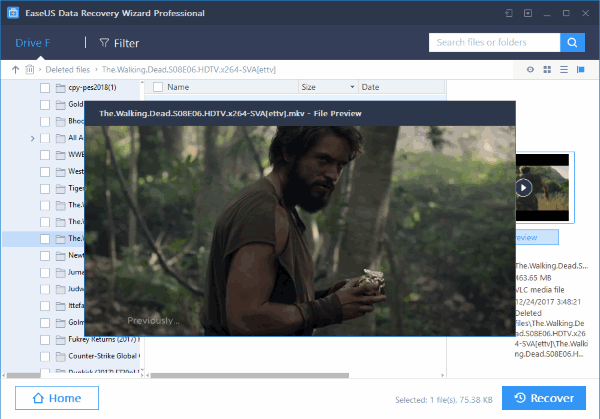
Step 4: Now, when you find the files which you want to recover, you can preview them to make sure that they are accessible. For that, all you need to do is select the file and click on the “Preview” button which will appear on the right pane. This works for images, videos, documents, etc. The best thing is that you can preview the files using the built-in viewers of EaseUS Data Recovery Wizard.
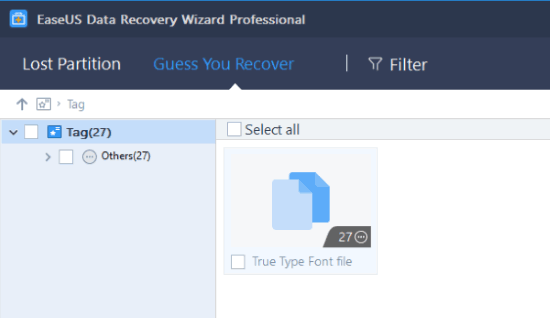
Step 5: If you complete the deep scan, then you will also see another tab at the top named, “Guess You Recover”. In this tab, you will find all the files found via RAW recovery. Do note that these files will not be associated with their native directory or even have the name. That means you would need to manually organize and rename them.
Step 6: If you want to save the current search session for later user, then all you need to do is click on the “Save Session” icon at the top. After that, it will let you export the search results as an RSF file and also import the same whenever necessary.

Conclusion:
So, this is how you can now easily recover your lost data using EaseUS Data Recovery Wizard. Unlike some other data recovery software, the efficiency of lost data recovery by this software is very impressive. Now, no more worries, if you have accidentally deleted some important data from your PC, formatted hard drives, or even lost a partition, as this recovery software can help you get back your data very conveniently.