In this article, you will know how to make Windows 10 portable with Windows To Go USB. Making a portable USB of Windows 10 will give you the freedom of carrying all your personal settings along with the data. So, when you using any other computer, you don’t have to spend extra time in adapting to that system, instead, you can plug your Windows To Go USB and you will have personal computer experience. Follow this simple guide and enjoy personal computer experience on other computers.
Prerequisites:
To create a Windows To Go USB, you need;
- A USB Drive (at least 16 GB, Windows To Go USB preferred).
- An ISO image file of the Windows version that you want to install.
- A Windows 10 PC.
There are many ways to create a Windows To Go USB, some of them are complex and others take too much time. Choosing the right way will save you from all the hassle and will save time. After trying different ways and tools, here is the best tool for creating Windows To Go USB which I found.
Rufus is a free software to create bootable USB drives. It is easy to use and take lesser time compared to the competitors.
Also Check:
Creating Windows To Go USB Using Rufus:
- Download the latest version of Rufus from here. The software is available in portable version if you prefer that over installation. Once done, plug in your USB drive into the computer.
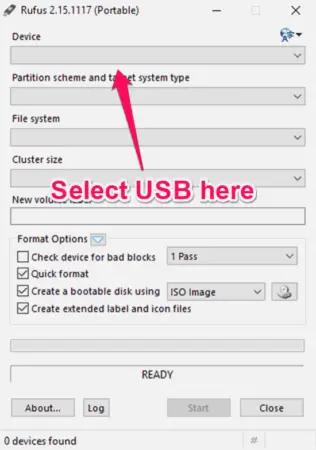
- Launch Rufus on your computer, the main window of the software will pop up. In the Device option, select your USB drive from the drop-down menu.
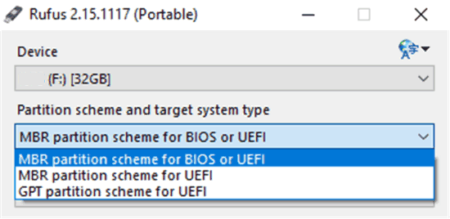
- Next to the Device option, there is partition scheme option. Here you have two choices;
If you want to boot the system in UEFI mode, select “GPT partition scheme for UEFI computer”.
And if you want to boot in Legacy mode then select “MBR partition scheme for BIOS or UEFI computer”.
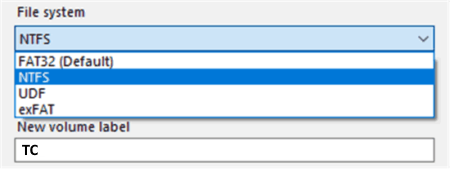
- Select NTFS file system under File system drop down and leave Cluster size default that is 4096 bytes.
- Now, come down to Format options, check following three options;
Quick Format,
Create a bootable disk using, and
Create extended label and icon files.
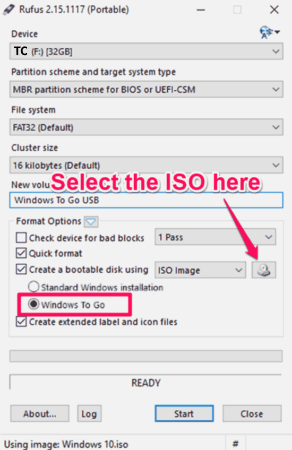
- Select ISO image beside ‘Create a bootable disk using” from the drop-down menu. Now, click on the disk icon next to that and browse the Windows ISO image file that you want to use for Windows To Go USB. And just below that, select Windows To Go option.
- After being through all these steps, click on Start button to begin the procedure. The process will take around 2-3 hours depending on your system, the Windows ISO image, and the USB drive you are using.
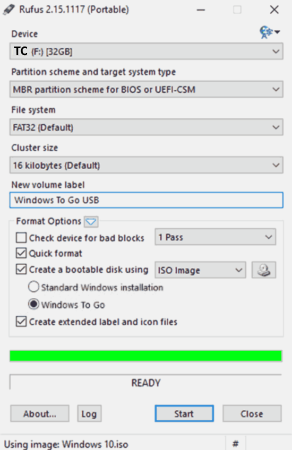
Once done, the bottom progress bar will be completely green and will show “Ready” message below it. And that’s when your Windows To Go USB is ready.
Conclusion:
This is the simple method to make your Windows 10 PC portable using Windows To Go USB and Rufus. Now, you can carry Windows 10 operating system in your USB flash drive and use it on any device without installation.