In this post, we will talk about how to use WordPress and start a blog from scratch in a step-by-step guide. Creating your blog is the best and easiest way to share your ideas and knowledge with the world. If you think making a blog from scratch sounds too complicated and technical, you can no longer go wrong. Because creating a blog is much easier than you think. That’s right!
Excited ?? I know you are.
You may also like:
- Top 3 Methods to Install WordPress Theme with Ease
- How to Offload WordPress Site Media Files to the Cloud
- 7 Best SEO Tips for WordPress Websites
Here are seven easy steps to start your lucrative blog without making a mistake and earn money with your blog.
Step 1: Choose a Niche For Your Blog
The first step before you start setting up your blog is choosing a niche. If you have already selected a niche, you should map your domain’s niche symptoms using our niche selection points and assess whether you have chosen a more than profitable niche.
This is the most critical and essential step in starting a blog from scratch. A niche is a topic that you write about most, or even exclusively, on your blogs. First of all, the question arises: “Which niche should I choose or which one suits me?”
To become a successful blogger, you need to choose a lucrative niche in which to write. So, pick whichever niche you can best write in and be good at it.
By choosing a niche of interest and having your perspective, you can make your blog stand out from the competition.
Step 2: Find a Domain Name For Your Blog
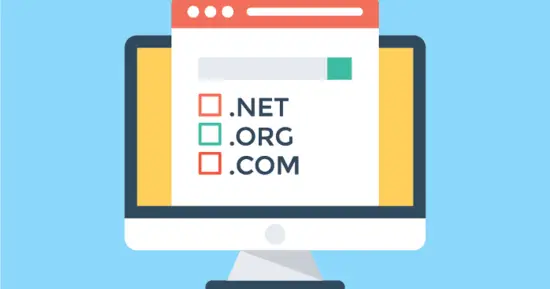
Finding the perfect new domain name for your website or blog can be a daunting task. But I promise that after reading the article in this section, it will only work in seconds.
It’s essential to have a domain name that is very much in line with your blog name. Otherwise, it’s hard for readers to find, especially if it’s just the beginning and there isn’t much on search engines. It would be best if you had an available and relevant domain name for blogs or businesses.
Choosing a domain name is simply the task of selecting the right brand and the right domain extension, where your domain name indicates the brand and the domain extension suggests your purpose and brand type.
Step 3: Choose the Right Web Host Provider

Okay, now you’re done with thinking and having what you want to get as your domain name (blog name). Now it’s time to see if it’s available and buy it from some reliable and secure hosting provider.
The best way to understand how hosting works is to imagine that the house is built on a land plot. You go through a real estate agency to buy land for your home.
Well, that’s the same “kind of” principle for a website or blog. A website needs internet space provided by an internet host/company.
To make things easier, the web hosting provider needs the basics only while registering a new hosting account.
Step 4: Set Up Your WordPress Blog

Yes, now is the time to start a blog. Name your blog, add a slogan, which is the keyword for your blog. Suppose you don’t have a slogan. Then leave the field blank. You can also add this later.
Click the radio button next to “Would you like a blog?” You can skip this if you want a regular (static) website with no blog posts. You can always add a blog later. However, for this tutorial, I’ll be assuming you want a blog.
After completing these steps, you will be asked to choose a topic. Skip this step of selecting free themes. Many free themes have security flaws. If you don’t have a list of favorite themes, you can customize them later.
You are now somewhat ready to start with what you have. First, you have a temporary domain: that’s okay. Full domain registration can take up to 24 hours.
When you post your website URL and navigate your website, you will see the Coming Soon page. Do not worry; You can delete this after logging into your WordPress admin area.
After registering your domain in less than 24 hours, you will be able to view your website with a default theme and content.
Step 5: Add Important Plugins to Your WordPress Blog
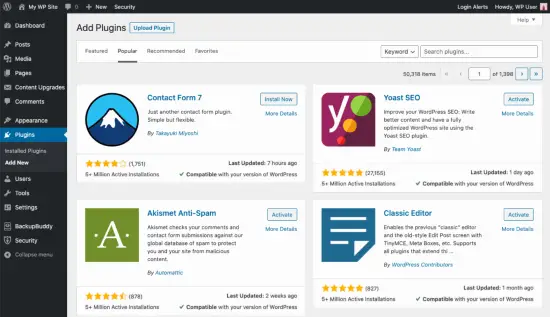
Plugins are part of what makes WordPress’s open-source platform so flexible. WordPress plugins are tools that add additional functionality to your WordPress blog without writing code.
You can almost create a WordPress website for any or any business you want.
For example, suppose you need an online store. There is a plugin called WooCommerce, and many WooCommerce plugins also support by WordPress, such as the WooCommerce product video plugin that helps make the online store more attractive to customers.
Initially, you can install plugins such as a contact form, Yoast SEO, etc., for your blog.
After you’ve logged in to the backend of your WordPress blog (control panel), scroll down, and you’ll see the plugins in the right sidebar. Hover your mouse over the plugin link, and it will open a drop-down menu with more options; select Add new.
You are on the Plugins page, and you can then search for a plugin to install or upload a plugin downloaded from the WordPress repository to your site.
Step 6: Install a WordPress theme
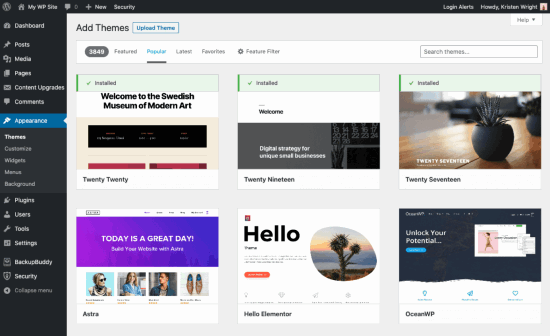
Okay, so the next part of installing your WordPress blog will install the theme of your choice.
The theme is also known as skin, and it makes each WordPress blog/website unique and different.
Installing a theme is as easy as installing an add-on. From your WordPress control panel, choose Appearance> Themes> Add New> Upload Theme, and select a theme to upload – assuming the theme’s Zip file is somewhere on your computer after you purchase it.
After uploading a theme, activate it and start configuring it by choosing Appearance> Configure.
Step 7: Write & Publish Your First Blog Post
After all, we did everything we could to create a blog. Start with technical tasks to choose a theme and install the required WordPress plugins.
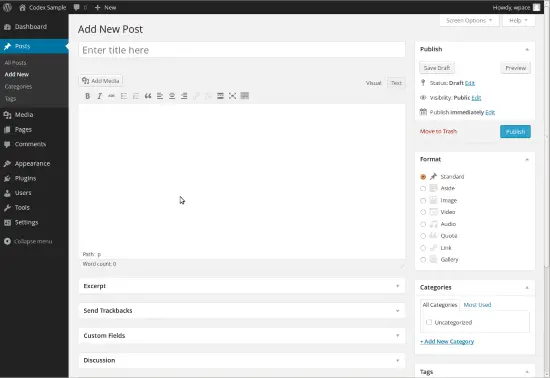
It’s time to post what you think. You can easily do this with Posts> Add New Tab.
This is where you can make your first great post.
First, do a little research on keywords in your niche and find some great keywords in your niche that you can easily rank for.
You can post blog posts or run scheduled posts from the right sidebar of Posts> Add New Tab.
Wrapping up:
That’s it! You are all ready to start blogging like a real pro!
I hope you find this article very helpful. For newbies and beginner bloggers, this article will help them create a blog and engage in the online world.
You can share your suggestions and questions with us in the comment box at the bottom of this post.