In this post, we will see how to use Facebook Slideshow feature to create slideshow videos on the Facebook app. To maintain its monopoly over social networks, Facebook has been integrating many interesting features to its main mobile app like the temporary profile picture, temporary frame, animated profile picture, etc. To make the app more useful and fun, this time they have added an amazing feature that you can use to create Facebook slideshow video.
This feature was first added to the Facebook Moments app, but now they integrated it with the main Facebook app. It allows you to take at least 3 or more photos and then turn them into an animated slideshow video. You can also add music tones offered by Facebook to the videos. When you create a Facebook slideshow video, you can share it to your timeline.
How to Use Facebook Slideshow Feature to Create Slideshow Videos?
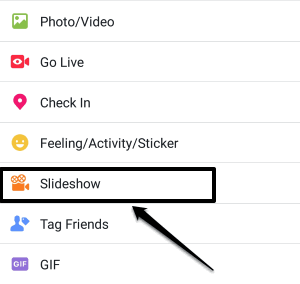
To begin, open the Facebook app and tap on the “Share an Update” option. After that, a new “Slideshow” option can be seen in the list of post options.
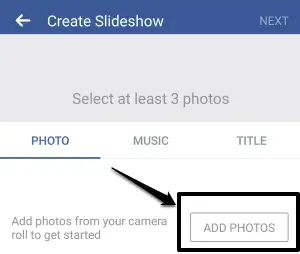
Select this option to open the Create Slideshow screen. At the bottom of the screen, there will be a button (Add Photos) which you can tap to add photos from your phone gallery. A Facebook slideshow can be made with at least 3 photos. If you want, then you can also capture new photos from the photo selection screen.
When you have selected the photos, press the Next button. This will automatically convert the photos into an animated Facebook slideshow video. You can preview the video, tag friends, and edit photos (add/remove photos) on the slideshow video.

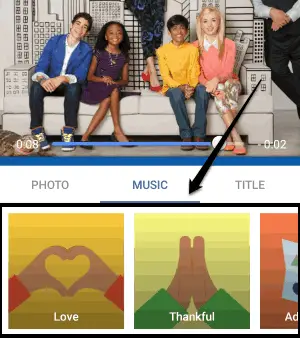
Facebook Slideshow feature will add a default music to the video, but you can change it by selecting other music offered by Facebook. To change music, tap on the “Music” tab at the bottom. Then select between all the available music tones like Inspired, Love, Thankful, Adventurous, Joyful, etc.
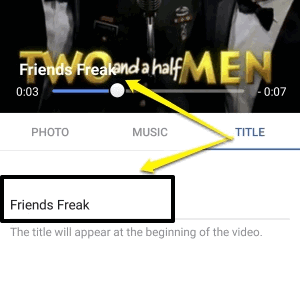
After adding a music tone, you can tap on the “Title” tab to add a title for the Facebook slideshow video. You can give any title you want and it will appear at the beginning of the video.
When you have added the title, press the Next button at the right top corner. Now, it will start creating the Facebook slideshow video. Once it’s done, it will be ready to be posted by you on your Facebook timeline.

Conclusion:
This is how you can use Facebook Slideshow feature to create slideshow videos on Facebook. No need to use any third-party app for creating a Facebook slideshow video, as this feature itself is the best slideshow app for Facebook.
Also Read:
- How To Add Flag Filter To Your Facebook Profile Picture
- How to Sync Facebook Birthdays with Google Calendar on Android


How do I add the slideshow opinion to my face book
@cindyanddanielsparks:disqus If you want to add the slideshow option, then all you gotta do is update your Facebook app. This feature is actually a new update from Facebook.
Is this only for smart phones or will it work on your desk top computer
Hi, this feature is not yet available for Facebook web application. You can only create and post slideshows from the Facebook app.
@andreaparkhurstwhitcomb:disqus The slideshow feature only works in the mobile app and not n the web version of Facebook.
My app is up to date and I don’t see the slideshow option in my “add to post”
Well, if the app is up to date and still you can’t see the Slideshow option, then the best option you got is to uninstall the app completely and reinstall it again. It worked for many users, try it out.
Well, if the app is up to date and still you can’t see the Slideshow option, then the best option you got is to uninstall the app completely and reinstall it again. It worked for many users, try it out.