In this post, we will talk about how to enable and disable Disk Write Caching in Windows 10. Disk Write Caching is one of those unique and useful features of Windows that enhances system performance and execution by enabling write caching on the PC. Nowadays, this feature is available on all disk drives. The advantage of Disk Write Caching is that it enables applications to run quicker by enabling them to continue without seeking for the data write requests to be written to the drive.
Suppose you save a file on your hard drive. When you do that, Windows takes a note that you want to save that files on the hard drive. This note is stored in Windows memory temporarily and later on it will write the file to the hard drive. When the file is finally written to the hard drive, the disk cache will send an affirmation to Windows that the file has been successfully written to the hard drive and it can now be deleted from the cache safely.

Tip: Disk Write Caching does not really write data to the hard drive, but it occurs after some time. But, if there is a system hang or power blackout, then the data can get corrupted or removed. So, even though the Disk Write Caching can enhance the performance of the system, it can likewise increase the vulnerability of data loss.
How to Enable Disk Write Caching in Windows 10?
By default, the Disk Write Caching feature will be enabled when you install Windows 10 on your PC. But, if you’re curious or want to manually enable the Disk Write Caching, then follow the steps below.
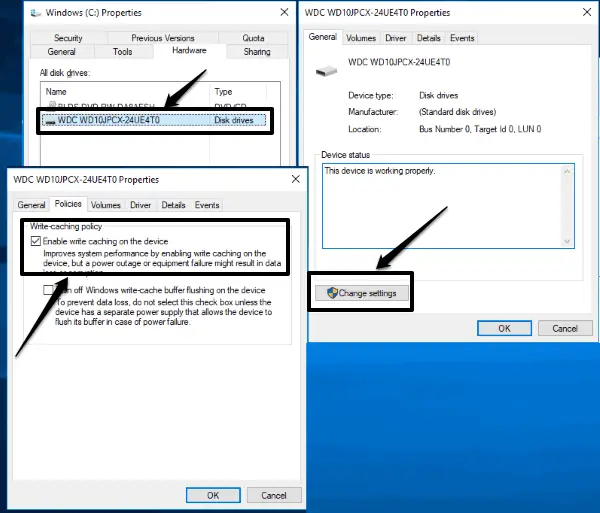
- Open up File Explorer and right-click on the “C” drive. The select “Properties” from the menu.
- After that, click on the “Hardware” tab and double click on the disk drives.
- Then under the “General” tab click on the “Change Settings” button.
- Now, go to the “Policies” tab and check the option “Enable write caching on the device”, that’s all.
How to Disable Disk Write Caching in Windows 10?
Sometimes, you might come across some errors like Delayed Write Failed and Windows Write Delay Failed. In that case, you might disable Disk Write Caching and see whether the problem is resolved or not. To disable Disk Write Caching in Windows 10, follow these steps.
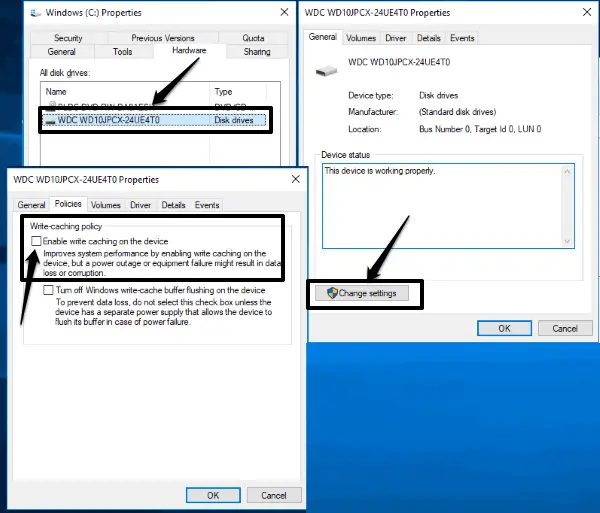
- Open up File Explorer and right-click on the “C” drive and then select “Properties” from the context menu.
- Then select the “Hardware” tab and double-click on the disk drives option. You can also select it and hit “Properties”.
- After that, under the “General” tab click on the button named, “Change Settings”.
- Then go to the “Policies” tab in the new window and uncheck the option that says “Enable write caching on the device”. This is it, the Disk Write Caching feature will be disabled.
Conclusion:
These are some of the important steps which you need to follow to enable and disable Disk Write Caching in Windows 10 PC. Keep in mind that disabling Disk Write Caching may affect the overall system performance and the hard drive might work slowly.


One Reply to “How to Enable and Disable Disk Write Caching in Windows 10”