In this, we will see how to hide 3D Objects folder in Windows 10. Microsoft introduced a new folder in “This PC” called 3D Objects with the release of Creators Update. When you open the Windows File Explorer, you will see this folder with the other folders: Desktop, Documents, Downloads, Music, Pictures, and Videos. It is also visible in the navigation pane. These folders are just quick access links to the original folders residing in the user profile in Windows 10 making it simple to open the file explorer and access the folders and their data.
But, if you’re not making any 3D graphics or models on your Windows 10 PC or just don’t want to see or use the 3D Objects folder, then you can get rid of the folder from This PC and also from the navigation pane. You can do that by applying a very easy Registry tweak.
So, here’s how you can get rid of the 3D Objects folder from This PC.
How to Hide 3D Objects Folder in Windows 10?
There are actually two methods to do that. You can either tweak the registry settings manually or install a pre-created registry key.
To manually tweak the registry and hide the 3D Objects folder, open the Registry Editor. You can do that from the run program or search for “regedit”.

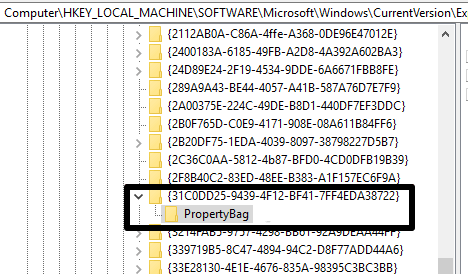
Then navigate to the following entry:
Computer → HKEY_LOCAL_MACHINE → SOFTWARE → Microsoft → Windows → CurrentVersion → Explorer → FolderDescriptions → {31C0DD25-9439-4F12-BF41-7FF4EDA38722} → PropertyBag.
The “PropertyBag” key associated with the 3D Objects folder will include a string ThisPCPolicy. You will notice that the value data of the string is written as Show. Now, you would have to change the value data from Show to Hide. You can double-click on the ThisPCPolicy string and type Hide in the value data to hide the 3d Objects folder from This PC in Windows 10.
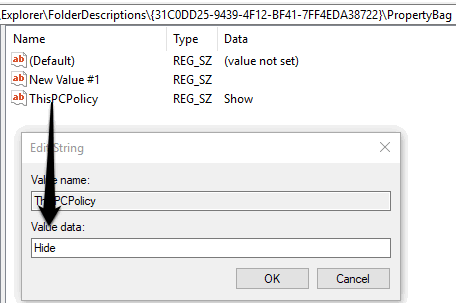
From that point onwards, the 3D Objects folder will be hidden from This PC as well as from the navigation pane. In case you want to get the folder back, then again change the Hide value to Show in the ThisPCPolicy string.
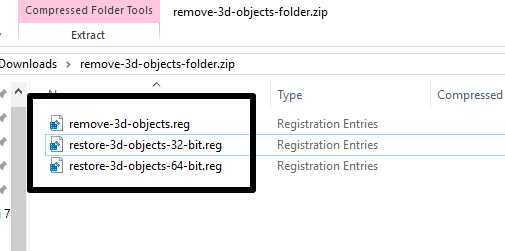
Another simple method to do this is to install a pre-created registry key. You can find the key inside this ZIP file. Open the ZIP file and run the “remove-3d-objects.reg” file. After that, the key will be installed and the 3D Objects folder will hide from This PC. You can get the folder back again by installing the “restore-3d-objects-32-bit.reg” or “restore-3d-objects-64-bit.reg” file from inside the ZIP file.
Note that both of these methods just hide the 3D Object folder from This PC and navigation pane. But, the original folder can still be accessed by entering the below path in the address bar of File Explorer.
C:\Users\%username%\3D Objects
Conclusion:
So, you can use both the methods to easily hide the 3D Objects folder in Windows 10. I don’t use this folder or create any 3D graphics, that’s why I have hidden the folder using these methods. If you also want to do that then these methods will help.