In this article, we will see how to check disk drives for errors in Windows 10. Your Windows 10 PC’s primary hard drive may at times report some kind of blunders or errors. This can also happen with external hard drives which were connected with your Windows 10 PC. So checking hard drives for errors now and then can help figure out what exactly the errors are, you would then be able to have them fixed with no issue. Since the disk errors aren’t normal or common in Windows 10 PC, what’s more, the causes may arise from improper shutdowns, bad sectors, corruption, malware, any physical damage, and so forth., it’s requested to have numerous ways to check disk errors in Windows 10.
Altogether, I will explain three compelling and effective disk error checking techniques for various demands. Pick any of the three techniques to settle and fix your Windows 10 PC’s hard drive performance issues, or any HDD and SSD hard drive which are not working in Windows 10 PC properly.
Also Check:
- PC Diagnostic Tool to Diagnose Hardware, Software, Disks, CPU
- Disk Cloning Software with Disk Management, Backup PC Data
How to Check Disk Drives for Errors in Windows 10?
Before you try the techniques make sure you’re logged in as an administrator to your Windows 10 PC.
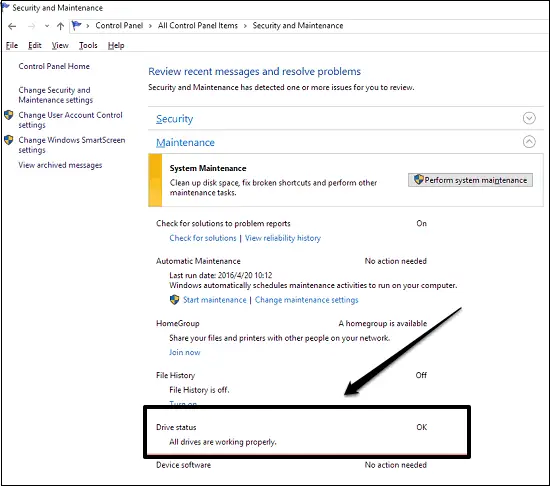
Technique 1: See Hard Drive Status in PC’s Security and Maintenance
For doing that, open Control Panel and select the Security and Maintenance option. Then extend the Maintenance section and look under Drive Status. As the below picture shows, all hard drives are working properly. On the off chance that any issues were discovered, the data would be changed with an option that you examine the drive.
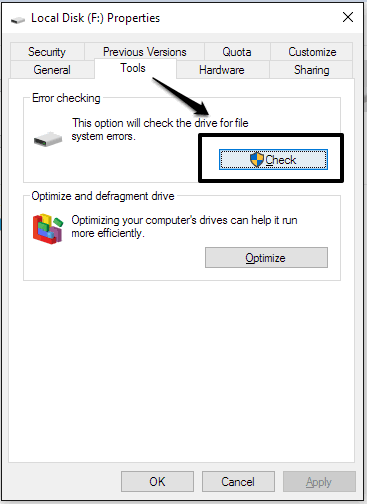
Technique 2: Check any Drive for Errors with In-built Drive Tools in Properties
To use this technique, open “This PC” in File Explorer and right-click on any hard drive (or HDD/SSD) you need to examine. Then select Properties and click on the Tools tab. After that, click on the “Check” button under the Error Checking section. Now, scan drive if needed or repair the drive if some errors were found. When the scanning is done, click on the “Show Details” link to see the Chkdsk log in the Windows 10 Event Viewer.
Technique 3: Check Hard Drive for Errors using Command Prompt
To begin, open an elevated Command Prompt with administrator rights or a Command Prompt during boot. In the Command Prompt, type the below command and press Enter. This will simply display the disk’s status.
The command is: chkdsk

You can also include one or more parameters which you might want to use (with a space between each parameter) and then press Enter. The available parameters are “f /r /x” which you can add to the CHKDSK command to fix errors automatically.
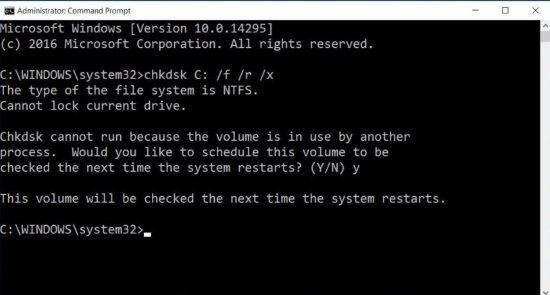
Actually, the /f parameter tells the CHKDSK command to fix any errors if it finds some, the /r to tell the command to discover the bad sectors and recover any of the readable information, and the /x will force the hard drive to dismount before the scanning process starts. You can use these parameters for individual hard drives by using the following command:
The command is: chkdsk [Drive:] [parameters] or chkdsk [Drive:] /f /r /x
Conclusion:
So, now you know how to check disk drive error in Windows 10 PC. You can use any of the techniques to check disk errors, as the source of the errors can be different. Doing that, you can easily and effectively fix your hard drive errors. If you like this article, then you can leave your comments below.