In this post, I will show you how to change installation directory of apps in Windows 10. When you install apps in your Windows 10 PC, they are automatically installed in C drive. But, if the disk space is running low in C drive, then before installing more apps to this drive you can change the installation directory to some other drive. In addition to selecting other drives of your PC, you can even change the installation directory to USB flash drives, external hard drives, etc.
Changing the installation directory will help you decide where new apps will install from Windows Store in your Windows 10 PC. There is actually a default option to change the installation directory of Windows 10 apps which means no third-party tool is required. This option is indeed very useful for those who have low disk space or those who just want to change the installation directory out of curiosity :).
Before changing the installation directory of apps in Windows 10, do note the following points:
- You can only select a single directory at a time for installing apps.
- Selecting network drives as installation directory is not allowed.
- The apps which you install after changing the directory will only install in that directory. That means previously installed apps will not move to the new directory.
- If you use any USB flash drive or external hard drive as the installation directory and remove it, then the installed apps will stop working until you connect the device again.
- If you use any USB flash drive or external hard drive as the installation directory and remove it, then the newly installed apps will reside in Windows until you connect the device again.
Also Read:
- How to Sync Google Photos with Windows 10 Photos App
- How to Reset Data Usage in Windows 10
- How to Use iCloud on Windows 10 PC
So, here’s how to change installation directory of apps in Windows 10 and decide where new apps will install on your PC.
How to Change Installation Directory of Apps in Windows 10?
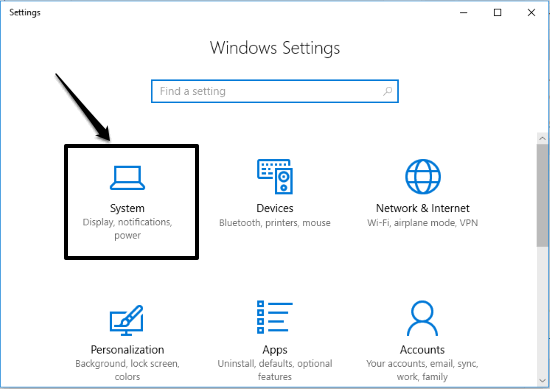
Step 1: Type “settings” in the search bar on the Windows taskbar and open up the “Settings” app. Then click on the “System” option.
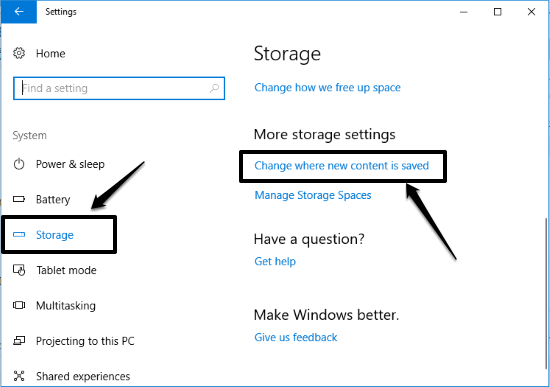
Step 2: After that, select the “Storage” tab from the group of tabs on the left side panel of the “S3ettings” window. Then click on the “Change where new content is saved” option under “More storage settings”.
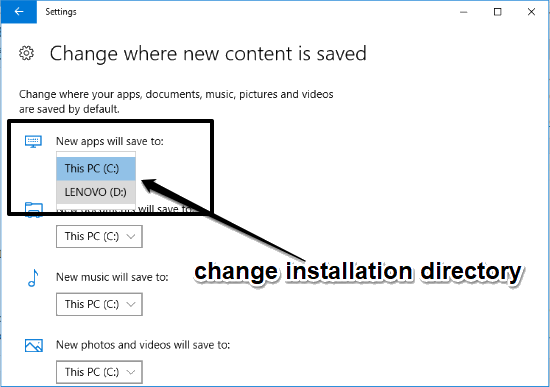
Step 3: Then you can click on the “New apps will save to” menu and select any drive you want as the new installation directory of apps in Windows 10. You can select other drives on your PC or removable storage devices. Now, when you install apps, they will be installed in the new directory.
Conclusion:
If the disk space of your default installation is running low, then changing the installation directory of new apps might help you from filling the little space which has left. You can follow the guided steps in this post to change installation directory of apps in Windows 10. The best part is no utility tool is required for this.


One Reply to “How to Change Installation Directory of Apps in Windows 10 [Creators Update]”